Create 3D Photo from Image JavaScript Tutorial
In this tutorial, we’re going to show you how to create an illusion of 3D photo from image using JavaScript and Pixi.js webGL library. Let’s check it out!
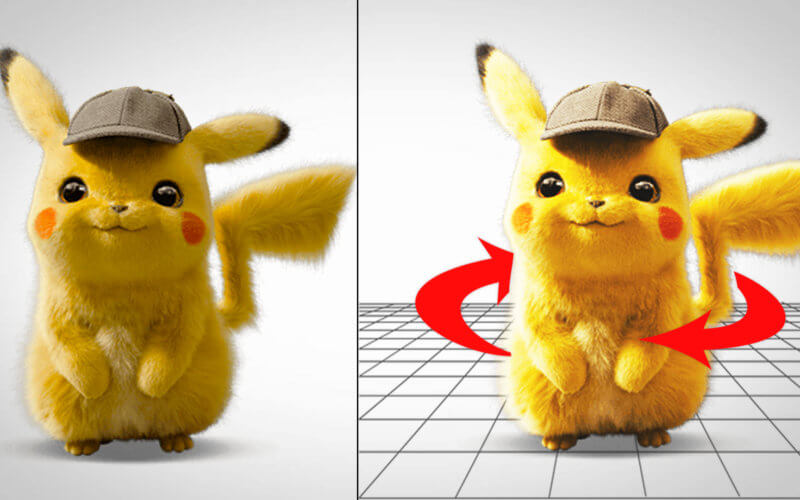
The Concept
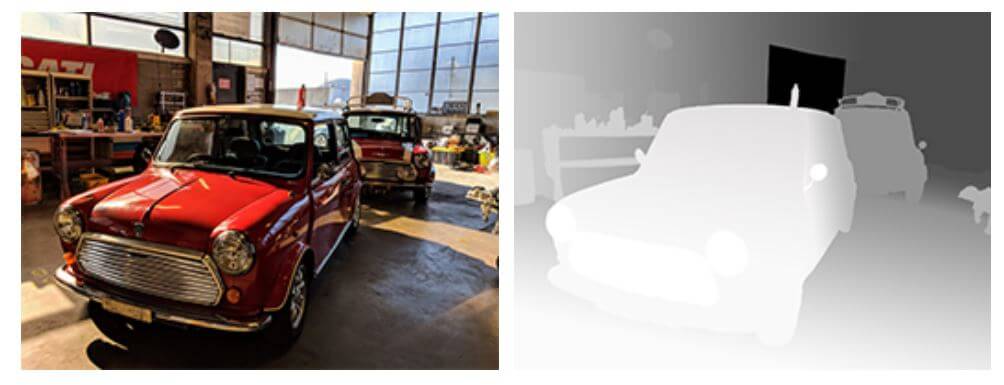
So in order to turn an ordinary photo into 3D one, we need to use a depth map (or some would call displacement map or height map) Like the name said, Depth map is an image file that show the depth for each pixel in the 3D world. As you can see in this example, the front of the car is closer to the screen hence the bright color while the rest of the garage is darker depending their distance.
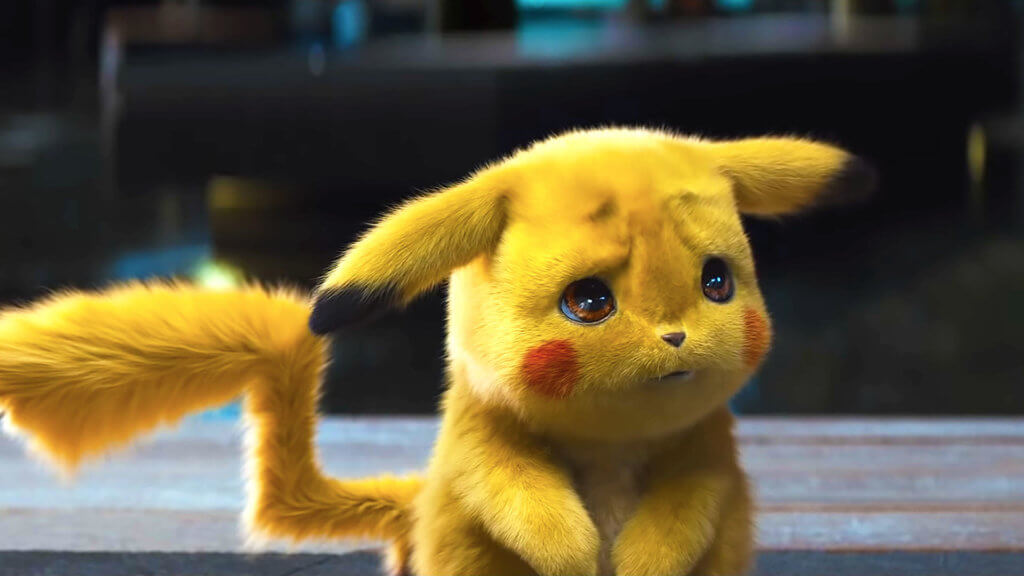
Then we’ll pass the depth map for processing and get the final result like this one. (Image credit: Oculus.com)

This is the same technique with previous video that I have created a water ripple effect.
The Code
Let’s start with download the latest version of Pixi.js and include it to the page.
<script src="pixi.min.js"></script>
Then create a pixi.js application. This is the fastest way to start using pixi.js. I’m going to pass the current viewport as the resolution. Then add it to our HTML page which the browser will see it as canvas element.
let app = new PIXI.Application({width: window.innerWidth, height: window.innerHeight});
document.body.appendChild(app.view);
And here is the image we’re going to add to the scene. Let’s create a sprite from the image URL and set the resolution to the current viewport. Then add it to the stage.
let img = new PIXI.Sprite.from("pikachu.jpg");
img.width = window.innerWidth;
img.height = window.innerHeight;
app.stage.addChild(img);
And now the next step is to create the depth map. I’m going use Photoshop to create it. First open the original image. Then create a new layer, fill it with black color and reduce the opacity so you can barely see the original image below.
Then select the brush with white color and 20% opacity. Start painting the area of the image that closest to the screen. The closer the more you have to highlight the area. You don’t have to be 100% accurate so don’t worry about the edges and some small details. Use brush with black color to remove any excess part.
And here is the finished depth map. Not a perfect job but it will do. (Note: Many people try to use Machine Learning to help creating depth map automatically. Here is the example)
Now then next step is to create sprite from the depth map and add it to the stage. Then create a displacement filter from our depth map and apply it to the stage.
depthMap = new PIXI.Sprite.from("pikachu-map.jpg");
app.stage.addChild(depthMap);

displacementFilter = new PIXI.filters.DisplacementFilter(depthMap);
app.stage.filters = [displacementFilter];
Mouse Event
Now you won’t see any 3D effect yet because we need to move the image on mouse movement. You can do that easily by adding mousemove listener.
We’ll scale the the displacement filter according to the mouse position. We need to substract the half of the screen size with mouse x and y position. So when mouse is on the right side of the screen, the result will be negative and create an illusion that the camera is moving to the right. Same goes for the left side.
window.onmousemove = function(e) {
  displacementFilter.scale.x = (window.innerWidth / 2 - e.clientX) /20;
  displacementFilter.scale.y = (window.innerHeight / 2 - e.clientY) /20;
};
I’ll also divide the result with some static number to reduce the sensitivity. You can adjust it to your preferences.
See the final result in the video below!
So that’s all for this tutorial. Hope you guys enjoy. If you love this kind of tutorial, don’t forget to follow our Facebook and subscribe our Youtube Channel. Stay tune for more. Thanks for visiting and see you next time Bye!

hey Stapler, thank you for tutorials.
this is my code
3D
let app = new PIXI.Application({width: window.innerWidth, height: window.innerHeight});
document.body.appendChild(app.view);
let img = new PIXI.Sprite.from(“house.jpg”);
img.width = window.innerWidth;
img.height = window.innerHeight;
app.stage.addChild(img);
depthMap = new PIXI.Sprite.from(“house-map.jpg”);
app.stage.addChild(depthMap);
displacementFilter = new PIXI.filters.DisplacementFilter(depthMap);
app.stage.filters = [displacementFilter];
window.onmousemove = function(e) {
displacementFilter.scale.x = (window.innerWidth / 2 – e.clientX) /20;
displacementFilter.scale.y = (window.innerHeight / 2 – e.clientY) /20;
};
but depth map isnt working, image is moving but without 3D effect., like depthmap is not loaded into instance.
what can be a issue?
thank you
Probably problem with your depth map image. Is it black and white/ same aspect ratio with original image?
no, same aspect ratio was used. but thank you for pointing out.
i found that problem was in image resolution, trying to find maximum allowed size in documentation.
with 5295×3530 jpg, engine not working.
It doesn’t work! I downloaded your pikachu images and renamed them properly and copied everything as you did. Help. The image doesn’t even load up for me.
yes for me
Here is my code
The picture opens and it doesnt move, so I only see the pikachu.img
I think I couldn’t get how to add the depth map properly. I am new to javascript but very eager, so I would be so happy if you could help me.
3D Photo Effect with Pixi.js
let app = new PIXI.Application({width: window.innerWidth, height: window.innerHeight});
document.body.appendChild(app.view);
let img = new PIXI.Sprite.from(“pikachu.jpg”);
img.width = window.innerWidth;
img.height = window.innerHeight;
app.stage.addChild(img);
depthMap = new PIXI.Sprite.from(“C:\Users\Bunyamin1\Desktop\pikachu-map.jpg”);
app.stage.addChild(depthMap);
displacementFilter = new PIXI.filters.DisplacementFilter(depthMap);
app.stage.filters = [displacementFilter];
window.onmousemove = function(e) {
displacementFilter.scale.x = (window.innerWidth / 2 – e.clientX) /20;
displacementFilter.scale.y = (window.innerHeight / 2 – e.clientY) /20;
};
edit: I think I should have deleted the ”
html>
head>
meta charset=”UTF-8″ />
title>3D Photo Effect with Pixi.js
/head>
body>
img src=”C:\Users\Bunyamin1\Desktop\pikachu.jpg” />
script src=”pixi.min.js”>
script>
let app = new PIXI.Application({width: window.innerWidth, height: window.innerHeight});
document.body.appendChild(app.view);
let img = new PIXI.Sprite.from(“pikachu.jpg”);
img.width = window.innerWidth;
img.height = window.innerHeight;
app.stage.addChild(img);
depthMap = new PIXI.Sprite.from(“C:\Users\Bunyamin1\Desktop\pikachu-map.jpg”);
app.stage.addChild(depthMap);
displacementFilter = new PIXI.filters.DisplacementFilter(depthMap);
app.stage.filters = [displacementFilter];
window.onmousemove = function(e) {
displacementFilter.scale.x = (window.innerWidth / 2 – e.clientX) /20;
displacementFilter.scale.y = (window.innerHeight / 2 – e.clientY) /20;
};
/script>
dipthMap and picture must be in one directory
thats not necessory
Could you please shar your sourcecode on github? I followed your tutorial and tried it out with 3 images!
Did not work out as expected. It would be a pleasure. Thanks.
it doesnt work properly like there are issues witd this depth. program doesn’t recognize it to good looks like glitched … :/ ….. are these pikatchu images availeble somewhere that i could compare with my pictures??
Hi, thank you for tutorial.
Can you help with my problem?
I have the same code/
window.onload = function () {
let app = new PIXI.Application({width: window.innerWidth, height: window.innerHeight});
document.body.appendChild(app.view);
let img = new PIXI.Sprite.from(“nevermind.jpg”);
img.width = window.innerWidth;
img.height = window.innerHeight;
app.stage.addChild(img);
depthMap = new PIXI.Sprite.from(“nevermind-map.jpg”);
app.stage.addChild(depthMap);
displacementFilter = new PIXI.filters.DisplacementFilter(depthMap);
app.stage.filters = [displacementFilter];
app.stage.width = window.innerWidth;
app.stage.height = window.innerHeight;
window.onmousemove = function(e) {
displacementFilter.scale.x = (window.innerWidth / 2 – e.clientX) /20;
displacementFilter.scale.y = (window.innerHeight / 2 – e.clientY) /20;
};
}
But my depth map image show me with another scale then original image. I see effect but with problem.
My original photo is stretched to the full size of the browser screen and the mask has the specified dimensions (1366х700px) how to fix this problem?
depthMap.width = window.innerWidth;
depthMap.height = window.innerHeight;
how can you make this responsive? like putting this into a div that is 100vh and 100vw?
canvas { width: 100vw; height: 100vh; display: block; }
I got little problem with positioning sprite over original image.
I follow exactly your code,
created depth map, but after running it in chrome/edge/..
it acts as depth map is positioned like 100px to the left, in other picture I try it’s 100px margined to the top and so on.
I have to manually move that map higher/more to the right,.. to adjust it to be in place where it should be.
Do you know where the problem could be?
I see only a black canvas.. the canvas is in the dom but no images are shwoing:
import * as PIXI from “pixi.js”;
class MouseMoveEffect{
constructor(){
let heroSection = document.querySelector(“.hero__bg-img”);
let app = new PIXI.Application({
width: window.innerWidth, height: window.innerHeight
});
heroSection.appendChild(app.view);
let img = new PIXI.Sprite.from(“../../media/Images/boxer-landing.jpg”);
img.width = window.innerWidth;
img.height = window.innerHeight;
app.stage.addChild(img);
let depthMap = new PIXI.Sprite.from(“../../media/Images/displacement-map-1.jpg”);
app.stage.addChild(depthMap);
let displacementFilter = new PIXI.filters.DisplacementFilter(depthMap);
app.stage.filters = [displacementFilter];
window.onmousemove = function(e){
displacementFilter.scale.x = (window.innerWidth / 2 – e.clientX) / 20;
displacementFilter.scale.y = (window.innerHeight / 2 – e.clientY) / 20;
};
}
}
export default MouseMoveEffect;
Getting this error too:
BatchRenderer.js:24 Uncaught TypeError: Cannot read property ‘Application’ of undefined
at new MouseMoveEffect (BatchRenderer.js:24)
at Object.parcelRequire.scripts/app.js…/styles/index.scss (BatchRenderer.js:24)
at newRequire (requestAnimationFrame.js:26)
at Runner.js:64
at index.js:104
This doesn’t work. I tried it with differente images, numbers, etc and It just didn’t.
here is my code and it’s working properly.
Document
let app = new PIXI.Application({width: window.innerWidth, height: window.innerHeight});
document.body.appendChild(app.view);
let img = new PIXI.Sprite.from(“pikachu.jpg”);
img.width = window.innerWidth;
img.height = window.innerHeight;
app.stage.addChild(img);
depthMap = new PIXI.Sprite.from(“pikachu-map.jpg”);
depthMap.width = window.innerWidth;
depthMap.height = window.innerHeight;
app.stage.addChild(depthMap);
displacementFilter = new PIXI.filters.DisplacementFilter(depthMap);
app.stage.filters = [displacementFilter];
window.onmousemove = function(e){
displacementFilter.scale.x = (window.innerWidth / 2 – e.clientX) /20;
displacementFilter.scale.clientY = (window.innerHeight / 2 – e.clientY) /20;
}
problem was on depthMap declaration.
Here is my code that worked or me (below)
The only thing I could not figure out was why images hosted in my directory were not showing up on the canvas. I had to upload my images to a website and then point to those images.
I also added in code for positioning the depth map appropriately thanks to @dummyk
Fields Auto 3D Photo Effect with Pixi.js
let app = new PIXI.Application({width: window.innerWidth, height: window.innerHeight});
document.body.appendChild(app.view);
let img = new PIXI.Sprite.from(“image.jpg”);
img.width = window.innerWidth;
img.height = window.innerHeight;
app.stage.addChild(img);
depthMap = new PIXI.Sprite.from(“depth-map.jpg”);
app.stage.addChild(depthMap);
depthMap.width = window.innerWidth;
depthMap.height = window.innerHeight;
displacementFilter = new PIXI.filters.DisplacementFilter(depthMap);
app.stage.filters = [displacementFilter];
window.onmousemove = function(e) {
displacementFilter.scale.x = (window.innerWidth / 2 – e.clientX) /20;
displacementFilter.scale.y = (window.innerHeight / 2 – e.clientY) /20;
};