2020 WordPress Security Guide for Beginners (10 mins)
So now you have setup your own WordPress website, the next step is to secure it. In this post we’ll talk about the most basic yet important steps to increase your WordPress website security against hackers. I try to keep this guide short and concise as much as I can. Let’s check it out 🙂
WordPress Level Security
WordPress is quite a secured platform due to it’s maturity and popularity. Lots of hack incidents were not related to WordPress core but mostly preventable issues like using easily guessable username/password and not updating security patch. Still there are some features that can be exploited and here are the easy steps to improve your WordPress security.
Disable xmlrpc.php
Simply put, XML-RPC (xmlrpc.php) is a WordPress communication method to other applications before REST API was implemented. It’s a thing in the past but still being used today by WordPress’s official mobile app and some plugins like JetPack. As XML-RPC allows a remote access and loggin, it pose a great security risk for hackers to exploit such as brute-forcing, DDoS and cross-site port attack. XML-RPC is expected to be removed from WordPress in the future but for now, we need to disable it. You can do it using plugins or manually using .htaccess like this (Note: You won’t be able to use WordPress mobile app)
<Files xmlrpc.php>
order deny,allow
deny from all
</Files>
Disable REST API
Similar to XML-RPC, WordPress also provide REST API access. This is another security hole that can be exploited. However many of WP’s admin functionalities are now depend on API so completely disable it might break your website. The workaround is to prevent unauthenticated users from all API access by using plugins like Shield Security or manually by editing WordPress file.
Put Website Behind CDN
Normally when browsing the website, users send requests to your server directly. Exposing your IP address for potential attacks. But if we put your site behind a CDN network like Cloudflare (Free) or CloudFront (Paid), then their Edge servers will make requests to your web server and serve the content to users instead. Your server will be protected from DDoS and other malicious traffics. Additionally, also significantly improve your site performance and lower bandwidth consumption due to content caching and faster network route.
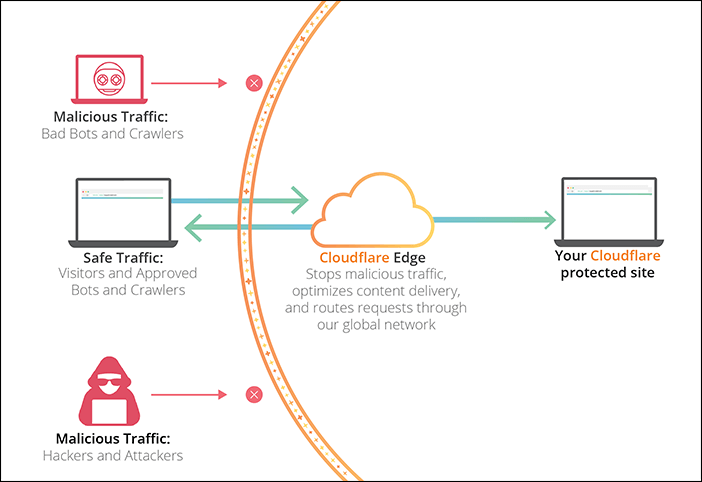
Once you implemented a CDN, it’s a good idea to allow only HTTP/HTTPS requests from the CDN’s IP address and block all direct access from others.
Don’t Use Your Contact Email as Username
Many websites leave a contact email address on the contact page. It’s not a good idea to use it as a credential of your WordPress account. If you do, hackers will only have to guess a password to get through.
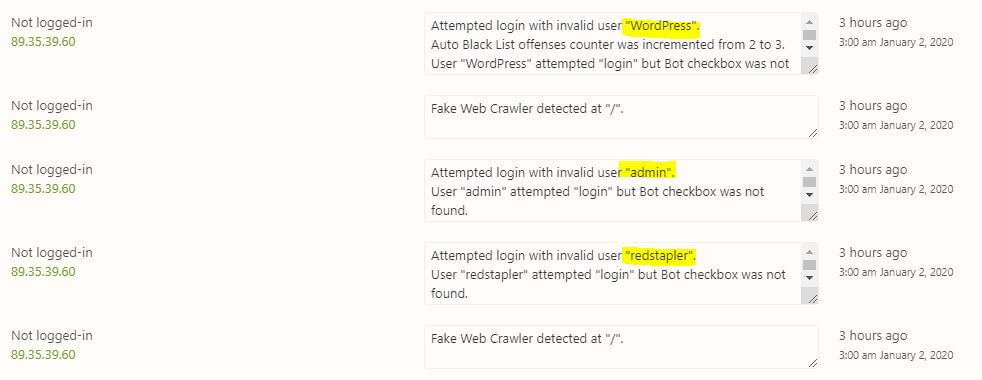
Auto Ban Offensive IPs
If someone try to login on your websites and consistently failed or try to access your xmlrpc.php, surely they don’t have a good intention and should be banned right away. There are some good plugins that will monitor these offensive attempt and auto-ban their IP address. You can set a limit of offensive count before the IP is banned or ban it right away for some action.
Monitor your Security Logs
Once you’ve installed a security plugin, most of them will keep an audit logs for any offensive attempt to hack or attack your site. It’s good to keep checking them regulary to see if there is any new threat to your website.
Change “admin” Username
When I have looked through my audit logs of offensive attempts. “admin” is perhaps the first username every attackers can think of. This is the most basic thing that might have been overlooked. Change it to something else!
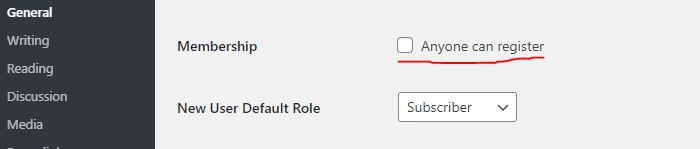
Disable New User Signup
If your website doesn’t take any membership, then disable it. This will prevent everyone from registering new user. You can find it in the WordPress general settings.
Keep Everything Updated
When WordPress/PHP Engine/plugins and themes release an update, most of the time they will include security and stability fixes. It’s important to keep your them updated to prevent zero-day exploit.
Redirect HTTP traffic to HTTPS
It’s critical that your site implemented SSL (HTTPS) as password and sensitive data will be transmitted in plain text over the network with HTTP which can be eavesdrop. Your website should redirect all HTTP traffic to HTTPS automatically. This can be done via .htaccess rewrite rules (see below snippet) or CDN page rules or WordPress plugin
RewriteEngine On
RewriteCond %{HTTPS} !=on
RewriteRule ^.*$ https://%{SERVER_NAME}%{REQUEST_URI} [R,L]
Side Note: Search engine will now penalize search result ranking of all unsecured websites.
DON’T Keep Backup on Website
Regularly Backup your website is good but several plugins make a simple mistake by keeping the backup file in publicly accessible area like wp-content folder. This make everyone can download your entire website and use it to exploit you. For example, creating a phishing site and analyzing theme source code for security hole.
Check your backup plugins and see where it keeps your backups. Switch to well known plugins like Updraftplus that can send the backup to your personal/cloud storage like Google Drive/ Dropbox/ Amazon S3.
Enable 2FA Authentication
Pretty straightforward, enabling 2 Factors Authentication provides you an extra security layer for admin account if your login credential is compromised. Many plugins let you choose to send OTP via email or authenticator apps on your phone.
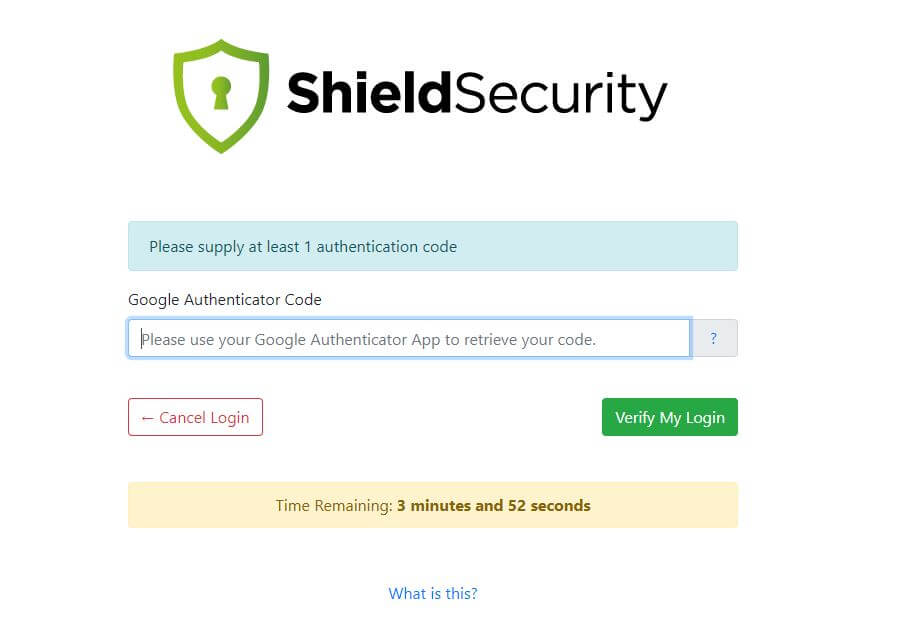
(Note: make sure to backup your site before implementing 2FA. If something goes wrong you might lose your admin access)
Prevent Hotlink and Content Stealing
Security is not about protecting your site from hackers but also from content stealing. Hotlink is when other websites put your image URL on their page directly. So when user visiting that page, it will load the image from your server and consume your resource instead. You can use the search keyword below in google to see if any of your image are being hotlink.
inurl:yourwebsite.com -site:yourwebsite.com
To prevent hotlinking, you can add rules to .htaccess like snippet below, using plugins or CDN setting
RewriteEngine on
RewriteCond %{HTTP_REFERER} !^$
RewriteCond %{HTTP_REFERER} !^http://(www\.)example.com/.*$ [NC]
RewriteRule \.(gif|jpg|jpeg|bmp|zip|rar|mp3|flv|swf|xml|php|png|css|pdf)$ - [F]
For content stealing such as “copy and paste” your article into their website, you can install a copy protection plugin to disable Ctrl+C/Ctrl+V and right-click. This will prevent most of the copying attempt unless they are skilled. Though I wouldn’t worry about this too much since search engine is now smart enough to detect duplicate content and “de-list” their website from search result.
Server Level Security
You might have a secured WordPress with super strong password and all the security plugins installed. But if someone managed to gain access to your cPanel or SSH access then it’s game over. If you’re using shared hosting plan, most of the tasks will be handled by the technical team. So it’s highly recommended that you choose a reputable host with active supports. But if you’re on unmanaged VPS or Cloud (AWS, Google, Azure) then you’ll have some works to do. Here is the checklist of important steps to secure your web server.
Hide cPanel URL (Shared Host/ Managed VPS)
Usually shared hosting will automatically create service subdomains or URL for you. For example, you can access your cpanel with cpanel.yourwebsite.com or yourwebsite.com/cpanel. This is convenient but also provide security risk. Unfortunately, changing it will require an edit to cpanel configuration file so you will need to consult with the support team on how to change/remove the URL.
Enable cPanel 2 Factors Authentication (Shared Host/ Managed VPS)
cPanel is now supporting 2 Factor Authentication (switch to a new host if their cPanel doesn’t) Enabling 2 Factor greatly improve your cPanel security and provide a fail-safe in case your credential is compromised as both phone and password are needed for login.
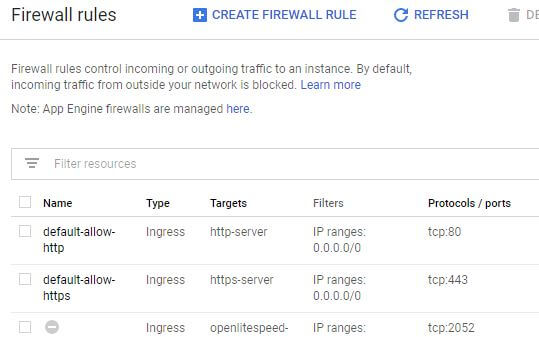
Allow only Necessary Ports
As a rule of thumb, allow only those ports you need and block the rest on your Firewall setting. Usually you’ll need TCP port 80 for HTTP, 443 for HTTPS and 22 for SSH. Depending on your server setup you might be able to block all UDP and ICMP (known as ping) protocol. This will prevent many possible exploits and attack that hackers can make. It should be noted that some web server require you to allow additional port for their console like port 7080 (Litespeed).
For VPS, you can controls firewall setting via iptables in Linux which is an OS Level firewall. But if you’re using Cloud VM you can even setup a network level firewall rules for your VM instance.
Use Key-based Authentication
Password can be guessed, keys cannot (technically it can but almost impossible) It’s recommended to switch your SSH authentication method to key-based method and disable the password. This is a nice article on how to setup. However, for some reason if you have to stick with password method, at least install a brute-force prevention service like fail2ban or IPBan
Backup Disk Image Snapshot
Backup is lifesaver in case your website was hacked or you did something wrong and broke it. Creating and restoring disk image (or snapshot) is relatively easy nowadays with just a few clicks (can be done in a few minutes for Cloud VM) Schedule at least monthly backup of your disk image is highly recommended.
Setup Down-Time Alert
If something goes wrong with your website, you would want to know it right away. There are services to schedule an interval ping to your website and send alert notification for downtime. For WordPress you can use JetPack downtime monitoring or if your site is on Google Cloud, you can setup Stackdriver monitoring (I wrote a tutorial about this)
Remember that nothing is hack-proof. But if you follow through this WordPress security guide, surely it will be a lot more difficult for the bad-guys. If you like this article, don’t forget to follow our Facebook and YouTube Channel for weekly tips and tutorials.
