Three.js Postprocessing Effect Tutorial
In previous tutorial, I showed you how to import a 3D model to Three.js. In this tutorial, we’ll show you how to add a postprocessing effect to your Three.js scene in just a few minutes! Ready? Let’s check it
Scene Setup
So same as previous tutorial. We’ll need to import 3 files to our page. First is Three.js core file. Next is Orbitcontrol.js to enable mouse control of the camera. And the last one is GLTFLoader.js to load our 3D model to the scene.
Then I’m going to reuse the code from previous tutorial to load the 3D model I found on Sketchfab. Essentially, we’re setting up a scene with white background with 4 PointLights around our model.
let scene, camera, renderer, controls;

function init() {
  scene = new THREE.Scene();
  scene.background = new THREE.Color(0xdddddd);

  camera = new THREE.PerspectiveCamera(60, window.innerWidth / window.innerHeight, 1, 5000);
  camera.position.x = 300;
  camera.position.y = 100;
  camera.position.z = 250;

  renderer = new THREE.WebGLRenderer();
  renderer.setSize(window.innerWidth, window.innerHeight);
  document.body.appendChild(renderer.domElement);

  let loader = new THREE.GLTFLoader();
  loader.load("scene.gltf", function(gltf) {
    let mesh = gltf.scene.children[0];
    mesh.scale.set(100,100,100);
    scene.add(gltf.scene);
  });

  #controls = new THREE.OrbitControls(camera);
  controls.addEventListener("change", renderer);

  let light1 = new THREE.PointLight(0xffffff,3);
  light1.position.set(0,300,500);
  scene.add(light1);

  let light2 = new THREE.PointLight(0xffffff,3);
  light2.position.set(500,100,0);
  scene.add(light2);

  let light3 = new THREE.PointLight(0xffffff,3);
  light3.position.set(0,100,-500);
  scene.add(light3);

  let light4 = new THREE.PointLight(0xffffff,3);
  light4.position.set(-500,300,0);
  scene.add(light4);

  animate();
}
function animate() {
  renderer.render(scene,camera);
  requestAnimationFrame(animate);
}
init();
And here is the rendered result

The Postprocessing
Now our scene is ready. Next we’ll work on the postprocessing. But first let’s talk about the concept.
Currently we use WebGLRenderer to render each frame and show it on the canvas. But suppose that we want to add a depth of field effect to the scene, we will need to calculate the blur amount and re render the scene again. This is the reason why we called it postprocessing because these process/render happen after the main scene rendering.
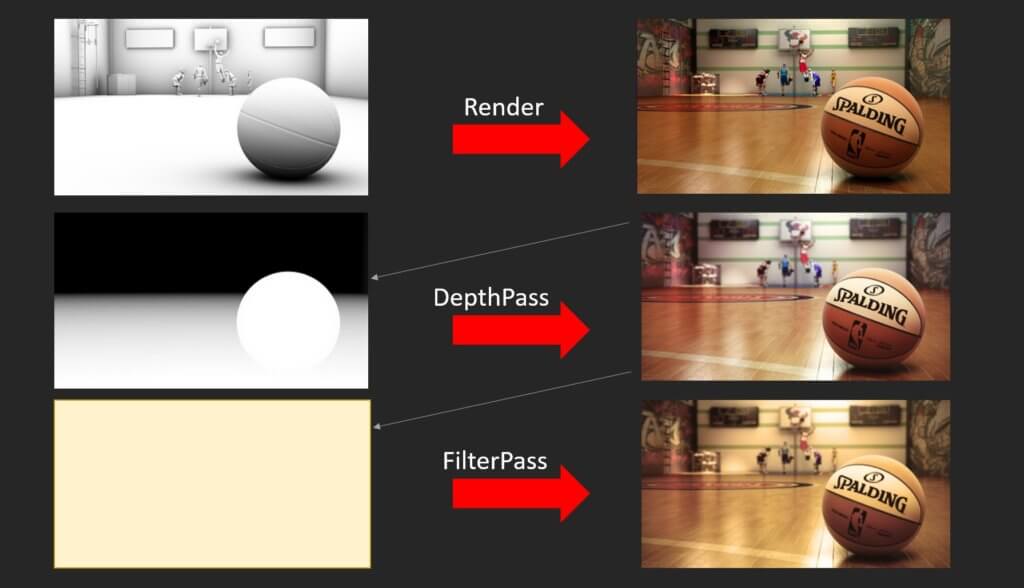
Postprocessing render can happen multiple times if you add several effects. We call each render as Pass.
First let’s import the three.js postprocessing plugin
<script src="postprocessing.min.js"></script>
Now instead of using WebGLRenderer, we’ll have to use EffectComposer instead. We can create a composer based on our renderer.
let composer = new POSTPROCESSING.EffectComposer(renderer);
Then we’ll start adding pass to the composer. The first and mandatory pass is renderPass. This is to render the main scene for other passes.
composer.addPass(new POSTPROCESSING.RenderPass(scene, camera));
Then we’ll create an effectPass and try adding HDR or Bloom effect. We’ll also need to set rendertoScreen to true to enable it
const effectPass = new POSTPROCESSING.EffectPass(
  camera,
  new POSTPROCESSING.BloomEffect()
);
effectPass.renderToScreen = true;
composer.addPass(effectPass);
Now we will have to render the scene from composer instead of original renderer.
function animate() {
  composer.render();
  requestAnimationFrame(animate);
}
And that’s it! Here is the result video
You can download project source code here and 3D model here

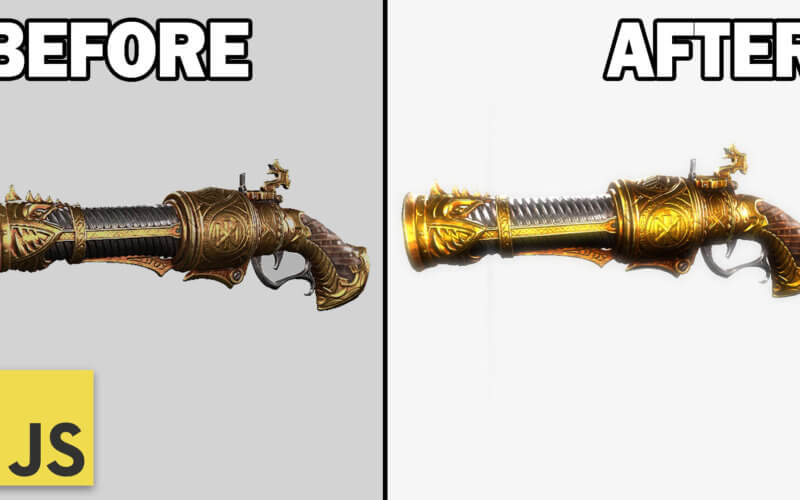
With this knowledge, now you can add stunning post processing effects such as volumatric light and anti aliasing
![]()
And that’s all for this tutorial. If you want to see more web design ideas ideas and development tutorials, don’t forget to subscribe our YouTube Channel to stay tuned!

Great tutorial. Can someone tell me if I can upload the 3model to an webserver and load it from that source?
Because I am uploading files always to “cloudinary” cloudservice and they dont allow 3models to be uploaded.
You’ll have some issue since it’s cross origin. Try add loader.setCrossOrigin( ‘anonymous’ );
Thanx for this nice tutorial. What if I want to change the bloom parameters, i.e. make it stronger ?