
SheetJS Tutorial – Create xlsx with Javascript
In this tutorial, we’re going to talk about SheetJs. An Excel JavaScript library that let you do so many things with Excel such as from creating exporting workbook from scratch, converting html table, array or JSON into downloadable xlsx file. And the best thing is that, everything will be done on browser-side only. No server-side script or AJAX involved at all!
There 2 versions of SheetJS, one is community version which is free, and Pro version which has extended feature. Obviously, we’re going to use community version for this tutorial. Just download from github and copy the xlsx.full.min.js to your web directory and include it to your script tag
Creating a Workbook
Now let’s start with creating a new workbook by calling book_new() utility function which will return an empty workbook object.
var wb = XLSX.utils.book_new();
You can update the workbook properties such as title, subject, author with wb.Props.
wb.Props = {
Title: "SheetJS Tutorial",
Subject: "Test",
Author: "Red Stapler",
CreatedDate: new Date(2017,12,19)
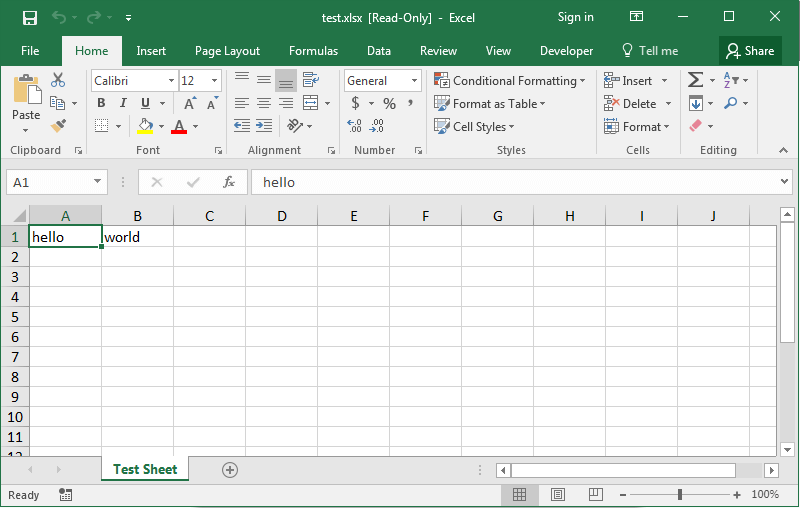
};Now we have the workbook, the next step is to create a worksheet and add it to the workbook. First, you’ll need to assign a new sheet name and push it to the SheetNames array.
wb.SheetNames.push("Test Sheet");Then, for the content inside the sheet, you have several options. You have create a sheet from array of array, JSON or html table. For this tutorial, I’m going to use array of array. The structure is quite straightforward. Each array represent the row data and the members are the cell content.
var ws_data = [['hello' , 'world']]; //a row with 2 columns
Now create the sheet from this array by using aoa_to_sheet()
var ws = XLSX.utils.aoa_to_sheet(ws_data);
And assign the sheet object to the workbook Sheets array.
wb.Sheets["Test Sheet"] = ws;
Congratulation, now you have created a workbook and a worksheet with first row of data. The next step is to generate an xlsx file.
Exporting Workbook for Download
We need to export the workbook as xlsx binary. Use write function then pass the bookType as xlsx and output Type as binary
var wbout = XLSX.write(wb, {bookType:'xlsx', type: 'binary'});We now have our xlsx binary data on wbout var. However, the correct content type for excel file is octet stream so you’ll need to convert the binary data into octet. We can achieve that by using arrayBuffer, UInt8Array and bit operation like this.
function s2ab(s) {
var buf = new ArrayBuffer(s.length); //convert s to arrayBuffer
var view = new Uint8Array(buf); //create uint8array as viewer
for (var i=0; i<s.length; i++) view[i] = s.charCodeAt(i) & 0xFF; //convert to octet
return buf;
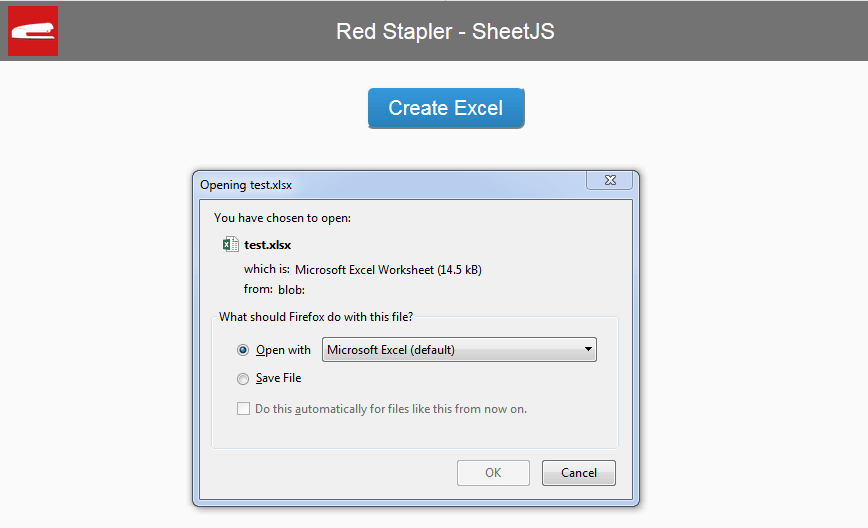
}We’re going to utilize Filesaver.js and Blob to handle the file saving for cross browser support. Use saveAs() function and create a new Blob object from octet array. Set the content type as octet-stream. follow by excel file naming that you would like.
$("#button-a").click(function(){
       saveAs(new Blob([s2ab(wbout)],{type:"application/octet-stream"}), 'test.xlsx');
});
We’re ready; Let’s test it!
You can see it in action in video below.
So that’s the basic of how to create Excel file with pure javascript using SheetJS. In next tutorial, we’ll show you how to convert HTML table into excel file in just a few minutes with SheetJS.
Check our other interesting tutorial from our Youtube Channel – Don’t forget to like or subscribe to stay tune 🙂
Source Code
<html>
<head>
<script src="jquery-2.1.4.js"></script>
<script lang="javascript" src="xlsx.full.min.js"></script>
<script lang="javascript" src="FileSaver.min.js"></script>

<link rel="stylesheet" type="text/css" href="styles.css">

</head>
<body>
<div id="navbar"><span>Red Stapler - SheetJS </span></div>
<div id="wrapper">

        <button id="button-a">Create Excel</button>

</div>
<script>
        var wb = XLSX.utils.book_new();
        wb.Props = {
                Title: "SheetJS Tutorial",
                Subject: "Test",
                Author: "Red Stapler",
                CreatedDate: new Date(2017,12,19)
        };

        wb.SheetNames.push("Test Sheet");
        var ws_data = [['hello' , 'world']];
        var ws = XLSX.utils.aoa_to_sheet(ws_data);
        wb.Sheets["Test Sheet"] = ws;

        var wbout = XLSX.write(wb, {bookType:'xlsx',  type: 'binary'});
        function s2ab(s) {

                var buf = new ArrayBuffer(s.length);
                var view = new Uint8Array(buf);
                for (var i=0; i<s.length; i++) view[i] = s.charCodeAt(i) & 0xFF;
                return buf;

        }
        $("#button-a").click(function(){
                saveAs(new Blob([s2ab(wbout)],{type:"application/octet-stream"}), 'test.xlsx');
        });

</script>
</body>
</html>
https://uploads.disquscdn.com/images/10c61a4e2b4e9a07cd118dc79bf21a9234b10f784df1b7705e1c9c5f9a84a99a.png
Hi, I wrote the same code as you to test but it didn’t work, I am getting these console errors and I don’t know what else to do, the only diference was that I didn’t find FileSaver.min
To solve this problem you have to add the filesaver minified version
I’m getting this error on line 30
ReferenceError: Can’t find variable: ArrayBuffer
Any idea why?
How to add new column ?
What do lines 35-36 add if you return the buf?
and if i want export JSON to Excel… how i do thad?
How can i customize the text on sheet js xls?, I want to set the text on center and to set the margin on “narrow”. Thank you for this good tutorial!
Hello good evening, can this Excel exporter define the width of the columns and add style?
From already thank you very much. Greetings.