
Chromeless Automation Tutorial
In this article, I’m going to show you how to use Chromeless and Node.js to do the Chrome automation. The benefit of Chromeless is that you can use it for testing automation, web crawling and scrapping and much more. Let’s go check it out!
Setup
First, you’ll need to have Node.js at least version 7.6 or higher. You can download it from Node.js official site. You can check your Node.js version by type “node -v” in command prompt. Once you’ve the latest version of node installed, head to your project directory, open a command prompt and type
npm install chromeless
Screenshot Example
Then let’s create our main javascript file. For this Tutorial, I’m going to use the example snippet on the github This example will search the google and capture the screenshot
Now let’s walkthourgh the code a little bit, first thing is to import the Chromeless. Then define an asynchronous run function
const { Chromeless } = require('chromeless')

async function run() {


}
Create a Chromeless instance, and then here is the automation part. You’ll see we can use a chain API methods call.
async function run() {
  const chromeless = new Chromeless()

  const screenshot = await chromeless
    .goto('https://www.google.com')
    .type('chromeless', 'input[name="q"]')
    .press(13)
    .wait('#resultStats')
    .screenshot()

}
Use goto method to navigate Chrome to www.google.com
.goto('https://www.google.com')Next type in the search query – For example, I want to search about “tesla model s” – Notice the second argument that you can use CSS selector so Chromeless can identify which input element it needs to type into.
.type('tesla model s', 'input[name="q"]')Next, press the enter key. The thirteen here is the enter key code.
.press(13)
Then, wait for the specified element to be loaded. In this case for google the resultStats div will appear when the search is completed.
.wait('#resultStats')Then call a screenshot method to capture the image and save it. and finally terminate the chromeless.
.screenshot()

console.log(screenshot) // prints local file path

await chromeless.end()
So here is the final code.
const { Chromeless } = require('chromeless')

async function run() {
  const chromeless = new Chromeless()

  const screenshot = await chromeless
    .goto('https://www.google.com')
    .type('chromeless', 'input[name="q"]')
    .press(13)
    .wait('#resultStats')
    .screenshot()

  console.log(screenshot) // prints local file path or S3 url

  await chromeless.end()
}

run().catch(console.error.bind(console))
You can see it in action in this video below
The location of the saved screenshot is at Local Appdata folder. You can change that with some extra modification to the code which I’m not going to cover it here.
Web Scrapping
In previous example, we have successfully use a Chromeless to search a google and take the screenshot. Now we will retrieve all the search result title and links as a JSON file which then can be used to process further.
Now let take a look on the google site when we do the search. You can see that each of the result will be assigned with class=”g” and the title will be in h3. So we’re going to take advantage of that
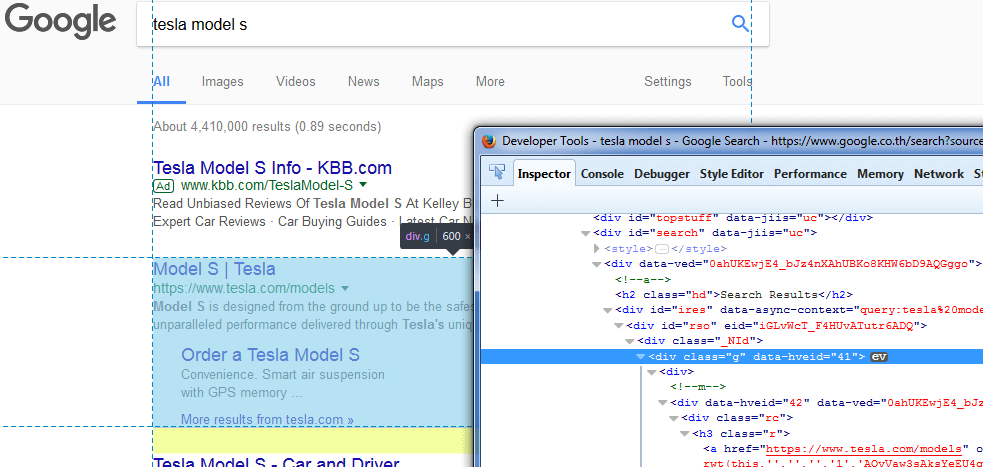
We’re going to use evaluate method which let us run a javascript code in the context of DOM. In this case, we need to select all class=”g” h3 element and their link. We can do that by using document.queryselectorAll. We can also use array.map to push each title and link into the array easily.
.evaluate(() => {
      const links = [].map.call(document.querySelectorAll('.g h3 a'),
        a => ({ title: a.innerText, href: a.href })
      );
Then return the JSON string using JSON.stringify
return JSON.stringify(links);
And finally write that JSON string into the file.
var fs = require('fs');
  fs.writeFile('c:/test_app/test.txt', links, function (err) {
    if (err) {
      return console.log(err);
    } console.log('The file was saved!');
  });
Here is the final code
const { Chromeless } = require('chromeless');
async function run() {
  const chromeless = new Chromeless();

  const links = await chromeless
    .goto('https://www.google.com/ncr')
    .type('tesla model s', 'input[name="q"]')
    .press(13)
    .wait('#resultStats')
    .evaluate(() => {
      const links = [].map.call(document.querySelectorAll('.g h3 a'),
        a => ({ title: a.innerText, href: a.href })
      );
      return JSON.stringify(links);
    });

  var fs = require('fs');
  fs.writeFile('c:/test_app/test.txt', links, function (err) {
    if (err) {
      return console.log(err);
    } console.log('The file was saved!');
  });

  await chromeless.end();
}
run().catch(console.error.bind(console));
See video below for live run
That’s it! I think this should give you idea of how to use Chromeless to do chrome automation. Let me know if you have any questions or comment. Hope you guys enjoy this video and don’t forget to like or subscribe our Red Stapler channel.
Very broken English, but a good post nonetheless. Thanks!
Thanks, RedStapler, good job and English as well.
Could you share more use-cases especially for React development?
Screenshot path seems not to be adjustable. At least there is no relevant explanation on the web, only questions.
Test set up is not an easy part of web dev, frustrating from time to time.
For example:
.goto(‘https://weather.skepton.ru/’)
.type(‘Berlin’, ‘input[type=”text”]’)
.press(13)
.wait(‘.day-item’)
is not gonna wait for Berlin and screenshots your actual location.
Do you have any idea how to arrange such a test?