Typed.js Tutorial | Javascript Typing Animation
In this post, we’re going to talk about typed.js tutorial. A JavaScript library that will help you create a typing animation on your web page. A good idea for a welcome message to your website visitor or simulating a development console and much more. Let’s check it out!
Setup
First let’s start with downloading the latest version from github and include typed.js or typed.min.js to your page with script tag.
<script src="typed.js"></script>
Now you will have 2 ways to provide the input string to typed.js. First is to have the library read the text from existing div element. Second is to provide an array of strings.
Typing From Existing Div
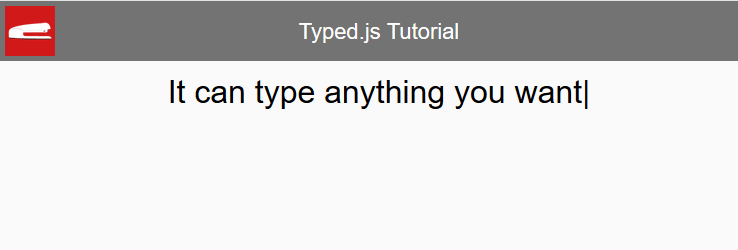
Here is the example text separated into 2 paragraph tag inside a div element.
<div id="typed-strings">
     <p>Typed.js is a <strong>JavaScript</strong> library.</p>
     <p>It can type anything you want</p>
</div>
Create a new span element that you want to create a typing animation.
<span id="typed"></span>
Then create a new Typed object and pass the span element Id, follow by a stringsElement option which specify the ID of existing div element containing the text.
var typed = new Typed('#typed',{
    stringsElement: '#typed-strings',
});
Let’s customize the typing speed and backspacing speed by adding the following options.
var typed = new Typed('#typed',{
                    stringsElement: '#typed-strings',
                    backSpeed: 40,
                    typeSpeed: 40
                  });
And here is the result.
Or see it in this video
You’ll see that typed.js will automatically hide the existing div and display only the span with typing animation. The benefit of using this method is the search engine will be able to see your text and index it.
Typing From Array
Another method is you can specify the array of strings like this.
var typed = new Typed('#typed',{
                    strings:["First sentence","Second sentence"],
                    backSpeed: 40,
                    typeSpeed: 40
                  });
Cursor is not blinking
At the current moment that I’m creating this tutorial, you’ll see that the cursor is not blinking. Someone is working on this feature, but for now you’ll have to manually add extra CSS for the blinking effect like this.
.typed-cursor {
    opacity: 1;
    -webkit-animation: blink 0.7s infinite;
    -moz-animation: blink 0.7s infinite;
    animation: blink 0.7s infinite;
}
@keyframes blink {
    0% { opacity: 1; }
    50% { opacity: 0; }
    100% { opacity: 1; }
}
@-webkit-keyframes blink {
    0% { opacity: 1; }
    50% { opacity: 0; }
    100% { opacity: 1; }
}
@-moz-keyframes blink {
    0% { opacity: 1; }
    50% { opacity: 0; }
    100% { opacity: 1; }
}
Cursor separated by line break
Another issue that many people have experienced with type.js is that the cursor will be on a separated new line on block display element.

To solve this issue, you’ll need to add display: inline or inline-block to the target element.
#typed {
    display: inline;
}
Customizing
There are lots more options available for typed.js. For example you can loop the animation by setting loop to true. Or shuffle the text sentences between each type.
var typed = new Typed('#typed',{
                   strings:["First sentence","Second sentence"],
                   backSpeed: 40,
                   typeSpeed: 40,
                   loop: true,
                   shuffle: true
                 });
You can find and try them all on the project documentation page.
And that’s it! Hope you enjoy this tutorial! Please like or subscribe to our Facebook and Youtube Channel to stay tune!

I want the typed.js to be stooped when I put mouse on the text. Can you help me out ?