
The Best Scroll Animation Library
In this tutorial, we’re going to show you how to easily create an animation on any HTML element that will trigger on scroll in just a few minutes using AOS library. Let’s check it out!
What is AOS
AOS is a library design especially for detecting and adding animation when scrolling. This is not to be confused with the lazy load because all the images will still be loaded at the same time and not the scroll. The AOS is working on the animation only. You’ll need to handle the asynchronous load by yourself.
The usage is very simple. Once install the library, you’ll only need to add data-aos attribute to the element you want to add the animation. Below code will make the div fade in upward direction when user scroll to it.
<div data-aos="fade-up"></div>
AOS have lots of built-in animation preset but you can also make a custom one if need.
How to Install
Let’s install the library using cdn (Or you can also download the library files/install via npm and host them) First, we’re going to add the CSS into the head section.
<link rel="stylesheet" href="https://unpkg.com/aos@next/dist/aos.css" />
Then add the JavaScript at the end of the body. Then call AOS.init() method to initialize.
<script src="https://unpkg.com/aos@next/dist/aos.js"></script>
<script>
   AOS.init();
</script>
Example
So here is the example page that we’re going to work on. I already added images and make them stack vertically. Then we’re going add the code to trigger the animation when we scroll to each image.
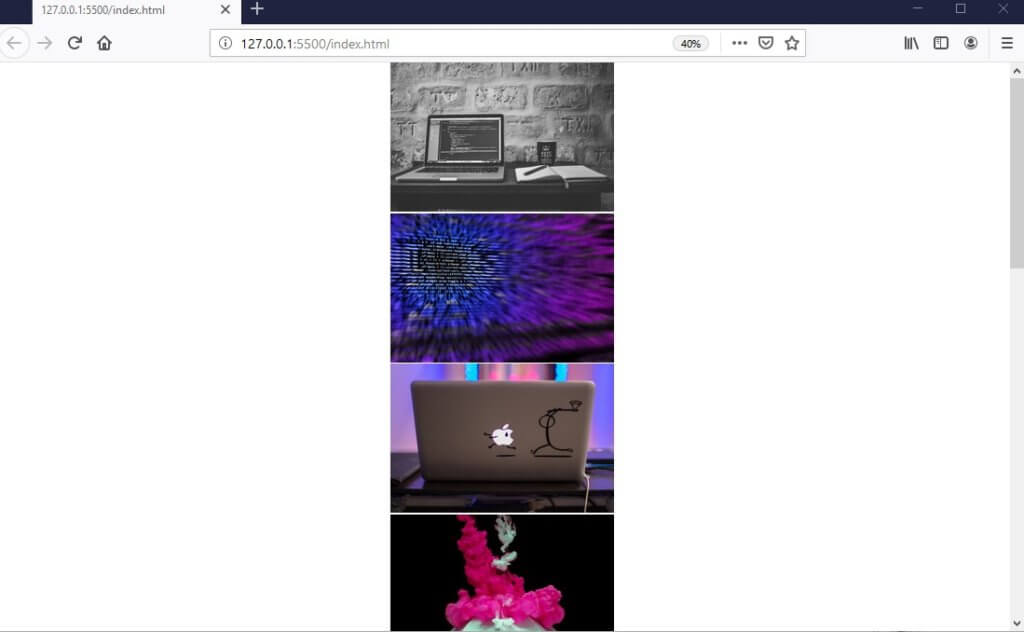
Then add the animation by adding data-aos attribute. In this case, I’m going to add a fade-in effect to all images in the page.
    <div class="img" data-aos="fade-in"><img src="1.jpg"></div>
...
    <div class="img" data-aos="fade-in"><img src="8.jpg"></div>
    <div class="img" data-aos="fade-in"><img src="9.jpg"></div>
    <div class="img" data-aos="fade-in"><img src="10.jpg"></div>
And that’s it!
Customization
Now let’s talk about the setting options. AOS allows you to customize the animation properties such as delay, offset or speed. There are two ways to change them. First is global option. When you initialize the library, you can add the setting object. This setting will be applied to all animation in that page.
AOS.init({
  // Global settings:
  disable: false, // accepts following values: 'phone', 'tablet', 'mobile', boolean, expression or function
  startEvent: 'DOMContentLoaded', // name of the event dispatched on the document, that AOS should initialize on
  initClassName: 'aos-init', // class applied after initialization
  animatedClassName: 'aos-animate', // class applied on animation
  useClassNames: false, // if true, will add content of `data-aos` as classes on scroll
  disableMutationObserver: false, // disables automatic mutations' detections (advanced)
  debounceDelay: 50, // the delay on debounce used while resizing window (advanced)
  throttleDelay: 99, // the delay on throttle used while scrolling the page (advanced)


  // Settings that can be overridden on per-element basis, by `data-aos-*` attributes:
  offset: 120, // offset (in px) from the original trigger point
  delay: 0, // values from 0 to 3000, with step 50ms
  duration: 400, // values from 0 to 3000, with step 50ms
  easing: 'ease', // default easing for AOS animations
  once: false, // whether animation should happen only once - while scrolling down
  mirror: false, // whether elements should animate out while scrolling past them
  anchorPlacement: 'top-bottom', // defines which position of the element regarding to window should trigger the animation

});
Second is individual option. You can add option attribute to the specific element that you want to customize and the setting won’t affect others.
 <div
    data-aos="fade-up"
    data-aos-offset="200"
    data-aos-delay="50"
    data-aos-duration="1000"
    data-aos-easing="ease-in-out"
    data-aos-mirror="true"
    data-aos-once="false"
    data-aos-anchor-placement="top-center"
</div>
For example, the animation will start every time I scroll down. But I want to change that behavior and play the animation only once. So I’m going to change the global “once” setting.
AOS.init({ once: true });Or if I want to add a delay the animation of a specific image by 2 seconds, I’m going to add data-aos-delay attribute for 2000 milliseconds.
<div class="img" data-aos="fade-in" data-aos-delay="2000"><img src="1.jpg"></div>
Use other Element to Trigger the Animation
The cool feature that I think it’s very useful is using other element as an animation trigger. You can make one element popup after you scroll to another element.
<div id="trigger-div"></div>
...
<div id="target-div" data-aos="fade-up" data-aos-anchor="#trigger-div"></div>
When user scroll to the trigger-div, it will start the target-div animation. Notice that I have to add “#” sign to denote the target div’s id. You can use “.” sign for class name as well.
You can see the tutorial video below
And that’s the basic the of AOS library. The library also offer more advance customization if you really need. But personally, I think the built-in preset they have will cover most the use cases. Check the Github project page for more details.
I hope this tutorial is useful for you guys. If you want to see more development tips and tutorials like this, please subscribe to our Youtube channel stay tune 🙂
